Showing posts with label vcops. Show all posts

Tuesday, August 27, 2013

VMworld 2013 Hands On Labs!

Here’s a little preview of one of our two OneCloud datacenters that is running VMworld 2013 Hands On Labs. We’re using Hyperic, vC Ops and VMware Log Insight to make sure that you guys have the best labs possible! Enjoy!

Check out these awesome custom vC Ops Dashboards!

vC Ops

This one displays vCD information such as the current VM Consoles that each cell server is serving to clients. Most of these metrics are gathered via a custom Hyperic vCD Plugin that we built (to be posted later).

vC Ops 2

Simple but effective Lab and VM deployment stats and trending.

SQL Deployments

Shout out to my co-worker Jacob Ross who was my teammate in designing and building the monitoring for VMworld 2013 HOL. Hope you all enjoy the show!

Thursday, September 27, 2012

VMware vCenter Configuration Manager–Auditing and Changing Local Accounts

One of the many useful features of VMware vCM is that you can audit local accounts for security risks and then through various actions remediate those risks. In this example I have discovered on my Windows machines that I have a single admin account that does not have the “Password Required” attribute set and want to disable the account. To get to this point I have collected “Accounts” data against my Windows machines.

image

Next I navigate to Security > Local Accounts and am greeted with the below graph. (Hint, you can skip the graph and go straight to the data grid if you hold down CTRL when you click on the “Local Accounts” button.) It is on this screen that I see that one of my admin accounts does not have a password enabled. Let’s click on it to get some more details.

image

Next I see all the information on the account. Also if you hover over that first icon on the left you will notice that it says the account is currently enabled. Not for long… Click on “Edit Properties”.

image

Your account is already pre-selected for change…

image

Select the Account Attribute…

image

… and say that you want it to be disabled…

image

Next run the action or schedule it for later.

image

Once that job completes we need to recollect from that machine to get the current status of the account information. To do that start a new collection and go grab the “Accounts” information.

image

Perfect, if you notice on the top graph 1 account now shows as disabled. Let’s drill into the admin account that does not require a password. Hopefully it will show up as disabled.

image

Looking at the first icon we see that it is indeed disabled. But let’s go one step further, lets use vCM to rename the account and change the password.

image

Next we go through the “Change Password” and “Rename Account” wizards and supply new values that we want. After the changes are complete and we recollect we can see that the password age is now 0 days, the account name has been changed and the account is disabled.

image

This little tutorial demonstrates a couple tasks that are really important and easily implemented.

1. Auditing Accounts (also includes password age, failed password attempts, date of last login)

2. Automatically changing passwords for Local Accounts (Yes, you can change multiple passwords at the same time.)

3. Renaming Local Accounts

Be pretty cool if you could do that all automatically right? Well, stay tuned for a later post on using vCM Compliance Rules to automate your compliance and remediation.

Tuesday, September 25, 2012

My Personal Quick Start Guide to Installing VMware vCM Prereqs

The complete and supported install guide for installing VMware vCenter Configuration Manager is located here but sometimes you just want a quick and simple install guide that covers most scenarios in a simple Single Tier install. At least I do for lab testing so here’s my quick version of the install guide. Be aware that it has been slimmed down by me for use in a test environment.  If you are installing in a production environment please ignore this and follow the real guide located on the VMware website and hyperlinked above. Also this guide is not a complete step by step tutorial but more of a general roadmap pointing out highlights along the route. It is assumed that you have experience with IIS and SQL at a minimum. A lot of the settings can be left at the defaults and I won’t specify that, I’ll just stop at the important things to change.
1. Install Windows Server 2008 R2 SP2 Standard Edition
2. Join machine to your domain and make yourself a local admin.
3. Disable IE Enhanced Security for Administrators and disable the UAC for convenience.
4. Reboot and login as your domain account.
5. Request a machine certificate. I did this via AD and Certificates Snap-In in mmc.exe.
6. Install IIS with:
Common HTTP Features:
1. Static Content
2. Dynamic Content
3. Directory Browsing
4. HTTP Errors
5. HTTP Redirection
Application Development:
1. ASP.NET
2. .Net Extensibility
3. ASP
4. ISAPI Extensions
5. ISAPI Filters
6. Server Side Includes
Health and Diagnostics:
1. HTTP Logging
2. Logging Tools
3. Request Monitor
4. Tracing
Security:
Just install them all.
Performance:
1. Static Content Compression
2. Dynamic Content Compression
Management Tools:
1. IIS Management Console
2. IIS Management Scripts and Tools
7. Configure IIS by going to IIS Manager and under the default website clicking on the “Advanced Settings” button on the right toolbar. From there you can change the “Connection Time-out” to 3600 seconds.
image
8. Next disable “Anonymous Authentication” and enable “Basic Authentication” under the Authentication settings on the Default Web Site. Also under “Bindings” add a HTTPS binding using your certificate.
image
9. Install SQLXML 4.0 SP1 x64.
10. Install Microsoft SQL Server 2008 R2 x64. It will probably tell you when you start the installer that .Net needs enabled or the Windows Installer needs updated. Click yes and it will do this automatically behind the scenes.
Configure a new instance with the below options installed.
1. Database Engine Services
2. Full-Text Search – optional
3. Reporting Services
4. Client Tools Connectivity
5. Management Tools – Basic
6. Management Tools – Complete
image
Use the default instance and continue on. Next set the SQL Accounts to all use the “NT Authority\System” and set the SQL Server Agent to Automatic.
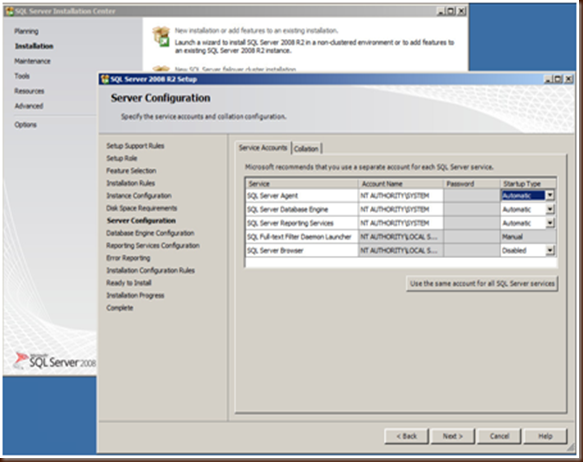
image
Next change the Authentication Mode to “Mixed Mode”, set a password and make sure to click on the “Add Current User” so that you are added as a SQL Administrator.
image
At this point complete the SQL install, patch it and you are ready to install vCM. Launch the installer and proceed through Foundation Checker. It should succeed:
image
At his point the hard part is over and the rest of the installer is stuff that is very specific to your environment. Once you complete the installer you are now ready to go. Have fun!

Monday, September 24, 2012

Configuring IP Pools and Installing VMware vCenter Operations Manager in the nextGen Web Client

If you have ever used vCenter Operations Manager with the non-web client you are used to having to create a new IP Pool before the vAPP will deploy. This was kind of a pain and apparently now using the NextGen Web client you don’t need to do that any more. The warning message is still in the vAPP but you can just ignore it because what happens behind the scenes is the Web Client will automatically create the IP Pool for you. Actually taking that one step further if you do create the IP Pool before deploying the vAPP your deployment will fail. Here’s the detailed why:

1. Create a new IP Pool which is now called a “Network Protocol Profile” under the Datacenter level where you want vCOps to live. I called mine vCOps since that is all it will be doing.

image

2. Next configure your IPv4 options. This is where it gets tricky. I want to manually specify what IP the Analytics and UI VMs get and in the past I just built a new pool and when I deployed the OVF I just specified the IPs for each VM. Let’s see what happens when I do that now… I’m going to create a pool of 2 IPs, one for each VM just like with the old thick client.

image

3. Next I specify Static – Manual IP because I am going to add the records to DNS.

image

4. And I specify what VM should get what IP. At this point I get an error message that says “The IP Address cannot be in the range reserved for the IP Pool of the network <Network Name>”. Huh, I thought that was the entire idea behind IP Pools…

image

If I go back a screen and change my IP Allocation setting to “Transient – IP Pool” then I won’t be prompted for what VM get’s what IP and as the vAPP is powered up you have a 50/50 chance that your VMs have the IPs that you want. Not what I am looking for…

5. For this to work I had to go back to my original “Network Protocol Profile” and give the IP Pool Range a single random IP that vCOps will NOT be using (too bad I can’t leave it blank) or uncheck the “Enable IP Pool” which seems very counter intuitive. Once I did that I was able to manually specify what IPs each vCOps VM should have. Again, totally counter intuitive…

image

At this point I realized that the message in the vAPP that tells you that you need to create an IP Pool is completely erroneous. If you deploy the vAPP without creating an IP Pool the deployment will succeed. The reason it succeeds is that it automatically creates a new IP Pool that looks like the below, one that shows the IP Pool is disabled….

image

Wednesday, March 14, 2012

Using VMware vCenter Operations Manager


As part of my day to day routine this morning I ran into a quick use case that offers a perfect introduction to VMware vCOPS and what it can do for your environment to help detect issues before they become issues as well as finding the root causes of performance problems. If you have never seen vCOPS before here is a funny video that pretty much explains what the product is all about: http://www.youtube.com/watch?v=mwYjwrE81eg


This example is a real life use case that happened to me this morning and demonstrates the value of real time, intelligent monitoring of dynamic environments.


As you can see from the below screenshot my vCOPS instance is monitoring 1700+ VMs. Some are in a production environment and some are in a lab environment. The really important part here is it took 3 seconds to recognize one of those 1,759 VMs had an issue... just 3 seconds...


Ok, so obviously red is not cool so let's click on it and see what information we are presented with...


A single click shows me where exactly the VM is located and also shows that this is an issue that is only effecting a single VM:


And I click on it again and I get all the information that matters to me: What is wrong, when it went wrong and what all is it affecting. In this case I see that 85 Anomalies were detected and the biggest indicators that something is wrong is that the CPU usage is up as well as the Memory. It also tells me that this machine has been working fine in the past and this is a new occurrence.


Ok, that's all nice and everything, but what is vCOPS actually looking at? Let's click on the Orange Anomalies Badge and see what comes up:


As you can see it has symptoms that it is alerting on and you can click on individual symptoms to get more details.


Interested in more details? How about letting you chose the metrics you want and getting them on a timeline? Sure! Just click on the All Metrics tab and you are presented with a list of metrics that are alerting and you can select the ones you want to get a pretty sweet datasheet like the one below:


So there you have it, how one piece of software can tell you what is wrong, what is affected and give you an idea of what needs done to fix it. All in a real-time, efficient and intelligent manner. The entire exercise took about 5 minutes to do a complete health check on 1,700+ VMs and figure out what was wrong with the one that I have covered here. If I can do the math right that means I did a complete health check on my environment at a rate of 586 VMs a second (totally ignoring the hosts and storage which were also checked) to figure out if I had an issue... and within a minute knew what was wrong with the VM having an issue... now that is pretty awesome!