I’m new to the ESXi Autodeploy bandwagon but I’ve got to say after using it for the first time I’m sold. If you are interested in what Autodeploy is a quick summary is that it allows you to dynamically install ESXi via PXE on servers and add them to your vSphere Infrastructure in an intelligent manner, all automatically.
For this real life example I have 2 Clusters of 7 HP BL490c G7 Blades that I need to dynamically provision with ESXi (complete with a custom NIC driver) and add them to the correct cluster based on IP ranges. Here is how I went about doing so.
Assumptions: I am assuming that you are not new to vSphere and that your environment already has a functioning vCenter Server (ver5), PowerCLI is installed, ESXi Coredump Collector and Autodeploy is installed. If you are missing any of these please follow the below link to get them installed before continuing: http://pubs.vmware.com/vsphere-50/index.jsp?topic=%2Fcom.vmware.vsphere.install.doc_50%2FGUID-CAB84194-3D8E-45F0-ABF9-0277710C8F98.html
A couple other things are also needed:
1. You need to set the hardware clock on all your servers to have the correct date and time. If you don’t do this there is a chance that you will run into an issue where the blades will not add to the cluster and you will find that they are trying to use an evaluation license, even with bulk licensing correctly configured.
2. A TFTP Server must be installed. I used the free Solarwinds TFTP server which I installed on my vCenter Server.
a. Create a folder called TFTP-Root
b. Create a folder called ESX_Depots
c. Open you vCenter Client and on the home screen select the “Auto Deploy” option. From there click on the “Download TFTP Boot Zip” and extract the contents into the TFTP-Root folder you created earlier.
3. Create DHCP Reservations for all of your blade servers and give them the following options:
a. All normal networking options (003 – Router, 006 – DNS, 015 – DNS Domain Name, etc…)
b. Add Option 066 “Boot Server Host Name” and give it the value of your TFTP Server, in my case this is also my vCenter Server.
c. Add Option 067 “Bootfile Name” with the value of “undionly.kpxe.vmw-hardwired”. You will notice that this is a file that is now located in your TFTP-Root directory from the zip file you extracted there.
4. You should be able to boot one of your servers at this point and see a screen that informs you that it booted from PXE and no ESX image is assigned and your server will reboot in 5 minutes… So far, so good…
At this point we have got the infrastructure in place to support ESXi Autodeploy and we have to create the actual ESX images that we want to install. Also we need to create the Host Profile(s) that we want to use and add a custom networking driver because the one included by default does not work with this specific model and generation blade. Let’s get started:
1. Download ESX Image – At this point you need to download a couple things from the VMware website. The first is the .zip Depot files for the version of ESXi that you want to install. The second is a package called vSphere-HA-Depot or vmware-fdm that you will need if you are going to add your ESX hosts to a HA enabled cluster.
2. In my specific case the driver that is included with ESX for our NIC on the BL490c G7 blade has a bug that was fixed by HP; that means that I will need to download the additional driver as well. Most people will not need to do this step unless you are using HP G7 blades with the NIC issues.
Once you have downloaded the software depots that are needed you are ready to create the ESXi image. To do that we are going to use the versatile PowerCLI. (Hint: If you are ever wondering about the syntax of a command or what options you have there is a great list of commands and syntax located at http://pubs.vmware.com/vsphere-50/index.jsp?topic=%2Fcom.vmware.vsphere.install.doc_50%2FGUID-16E1D78F-2466-4794-8D12-BE5EC7AA41D3.html)
Step 1: Adding software depots: We downloaded all these software depots (ESX, drivers and vmware-fdm) but now we need to make them accessible for use in the PowerCLI. To do that we add all of them via the syntax: Add-EsxSoftwareDepot –DepotUrl “c:\esx_depot\<filename>

Now we should be able to see all of our available software packages (VIBs) by issuing the command get-EsxSoftwarePackage:

On this screen you can see that we have 2 versions of the net-be2net, the newer one being from Emulex as well as a new file called vmware-fdm. Cool, we are on a roll….
Next we need to clone the original ESXi image so that we can make changes to it. First let me show you what the default looks like: Execute Get-EsxImageProfile and you should see the 2 entries for the version of ESX that was in your depot that you added. Now using New-EsxImageProfile –CloneProfile <original name> -Name <New Name> create a copy of the ESXi image that we will be editing with our driver and vmware HA Depot (vmware-fdm).
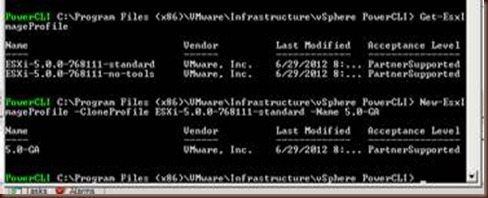
Now that we have our ESXi Image created we need to add the new driver and the vmware-fdm VIBs. Here’s how I did it:
1. For demonstration purposes I tried to remove the vmware-fdm and as you can see it failed because it is not included by default. Next I removed the Broadcom network driver from our Image. That one succeeded as expected.
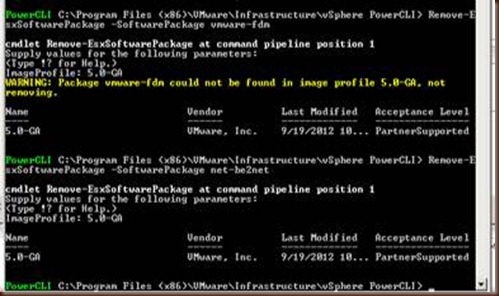
2. Now I need to add the new network driver. In theory I could just specify the driver by name and it would install the new one because the version number is higher but just for grins I want to manually specify the entire driver name and version… You can see from the below screenshot that you can specify the short name or the name and version.
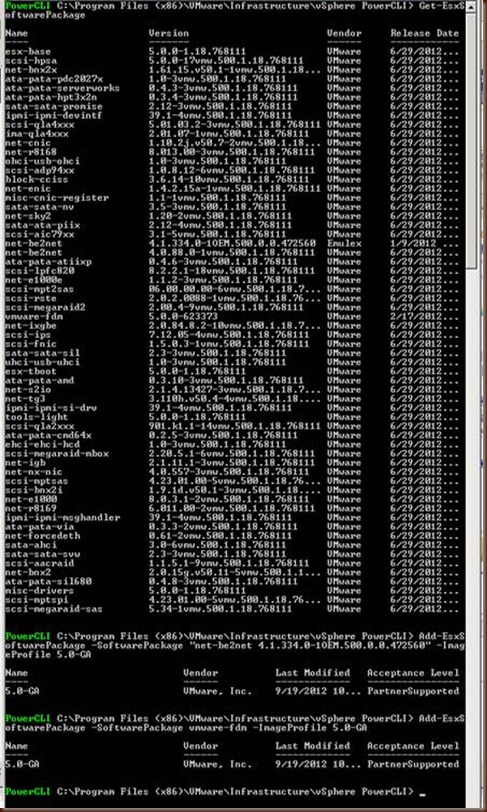
Now that we have this nice new shiny ESXi image with custom drivers, now what… Well, we need to create a Deployment Rule that has the logic that tells vCenter what servers get this image as well as what Host Profile to use but before we go there I need to throw out a couple hints.
Hint #1: On your first round you will want to create a deployment rule that does not use a host profile. Once that server is provisioned you will want to configure it and then use it as a template for creating your Host Profile that will be used to build all the other servers.
Hint #2: You will get a message that the password was not changed on the ESXi servers even if you create a host profile using a server as a template that has a valid root password. You need to manually edit your Host Profile after creating it to have the below information to get a new root password applied to your hosts as they come online.

Hint #3: You will most likely get a couple errors when you try and apply your host profile that say the Path Selection Policy needs changed and that the “device mpx.vmhba32:xx:xx:xx needs to be reset.” These errors are sometimes caused by virtual CDROMs or local storage and will cause your servers to fail compliance. This is easily avoided by disabling those options in the host profile if you so choose. A great article on doing so is located at http://bsmith9999.blogspot.com/2012/01/vmware-host-profiles-giving-errors.html
Hint #4: You can configure the ESXi Dump Collector via Host Profiles but for some reason I had to do it manually on my first host (the one that you create the host profile against) using the below command for it to work properly. Maybe just something goofy that I did, or maybe not… anyways here are the commands to do it manually:
Esxcli system coredump network set –interface-name vmk0 –server-ipv4 <ip of coredump server> --server-port 6500
Esxcli system coredump network set –enable true
And the location in the host profile:
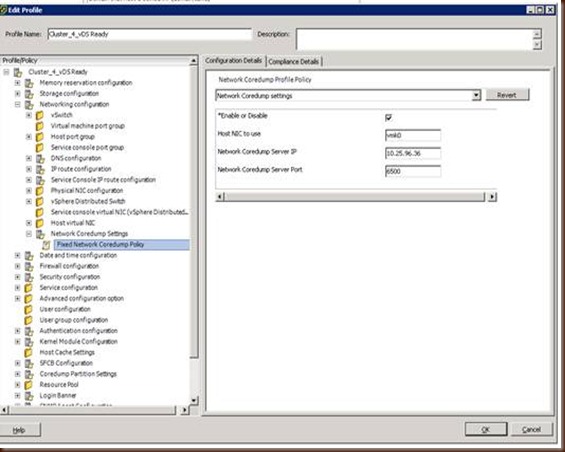
Ok, now that you have created your host profile using the first host now it is time to refine your deployment rules. First off go ahead and delete your original deployment rule that did not include any host profiles or install patterns since it is no longer needed.
Remove-DeployRule –Name <Whatever you named it>
Now we create a new one that uses IPs to limit what servers get the ESXi image installed and assigns them the new Host Profile we just created.

As you can see from the above screenshot we do a couple things:
Create a new Deployment Rule called vCD_Cluster_4 that uses:
i. “Cluster_4_vDS Ready” Host Profile
ii. 5.0-GA ESXi Image Profile we created earlier
iii. Adds the servers that fall into the 10.25.96.29-35 to the “Cluster 4” Cluster in my vCenter. All servers that are outside of this range will not get this install.
Last of all we need to enable that Deployment Rule by issuing the below commands:

One last hint: If you have a Host Profile assigned to the cluster in vCenter that Host Profile takes precedence over the one that you specified in the Deployment Rules.
There you go, now you have a good idea on how to get your environment up and running via ESXi Autodeploy complete with HA VIBs and a custom driver. It’s really cool technology and now I don’t know why I’ll ever need an ISO of ESXi again…


