Thursday, September 22, 2016

Corrupt Microsoft SQL Database Log in AlwaysOn High Availability Group (AAG)

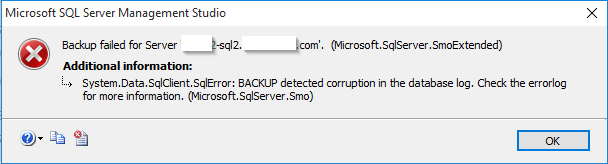
We recently ran into an issue with one of our environments where the Microsoft SQL Server experienced corruption in the database log. This issue is usually discovered when you attempt to create a new backup and it fails with the message "BACKUP detected corruption in the database log"


Resolving this issue is normally fairly easy (set the database from a Full Recovery Model to simple and then back again) but it gets a bit more complex when you database is replicated via an AlwaysOn High Availability Group. Here are the steps to fix it (assuming no other databases are in the AAG).

1. Remove Secondary Replica - First we need to stop replication to the secondary replica. To do this we are going to connect to the primary node in our cluster and right click on the SECONDARY replica. Then we select "Remove from Availability Group" and follow the wizard.


2. Remove Database from AAG - Next we need to remove the database from the AAG by right clicking on it under the Availability Databases folder and selecting "Remove Database from Availability Group"

At this point you should have your primary node as the only member of the AAG with no databases associated. At this point you are going to delete the database from the SECONDARY node. Your secondary server should now have no replicas, no availability databases and no database. 

3. Next we need to change the remaining copy of the database on our primary node from Full to a Simple Recovery Model by right clicking on the database and selecting properties > Options.

4. Next we need to do a full backup of the database.
5. Repeat the steps in #3 but in this case change it from simple back to the original Full Recovery Model.
6. Backup the database again.

Now we are ready to re-add the secondary replica

7. On the primary server right click on the Available Replicas folder and select "Add Replica..."
Next you will need to select the "Add Replica" button and will be prompted to connect to your secondary server.

After this you will want to configure your replica. In our case we have selected to have the secondary copy of the database as readable as well as enabling automatic failover.

In the next screen you will need to configure your sync preferences. We are using a Full sync which requires a file share accessible by both SQL Servers. Using this file share SQL will run a backup and place it on the remote share and the secondary node will restore the database from this initial backup. 

Follow the wizard and verify that everything passes

After this you can track the progress of the backup/restore/sync

With that you should have a working AlwaysOn Availability Group again!

Friday, September 16, 2016

FreeTDS and Microsoft SQL Server Windows Authentication - Part 1

I've been trying to get the Zenoss SQL Transaction Zenpack working so that we can use Zenoss to run SQL queries for specific monitoring purposes and ran into a few things that might be worth sharing.

Using tsql for troubleshooting

Zenoss, among many other tools uses pymssql to connect to your SQL Servers; and pymssql uses FreeTDS behind the scenes. If you can't get pymssql to work them you can go a layer deeper to see if you can find the issues. In my case I have the following configuration:

Fedora Server 23
freetds-0.95.81-1
pymssql-2.1.3

First off, FreeTDS uses a config file at /etc/freetds.conf that has a [Global] section and examples for configuring individual server types. This is important because you need to use TDS version 7.0+ for Windows Authentication to work.

If we try to connect using the diagnostic tool tsql (not to be confused with the language T-SQL) without changing the default TDS version or adding a server record in the config file our attempts will fail

To fix this you can either:
Change the Global value for "tds version" to be 7+ (sounds like a good idea to me if you only have MSSQL):

or you can add a server record for each Microsoft SQL Server and leave the global version less than 7.


The catch to second method is that when you do your queries you will have to call the name as shown in the config file (in this case us01-0-srs1) and you cannot use the FQDN or it will fail because it defaults back to the Global setting. This method also creates overhead in managing the list of MSSQL Servers in the freetds.conf file.


Either way, at this point you should have tsql being able to query your MSSQL Servers using Windows Authentication


Getting started with pymssql
To make sure that pymssql is working I threw together a quick bit of python that allows you to connect using Windows Authentication


It's basically a simplified version of the example on the pymssql web page, but will prove if pymssql and MSSQL Windows Authentication is working or not.

-------------BEGIN Code
import pymssql

print('Connecting to SQL')
conn = pymssql.connect(server='server.domain.com', user='DOMAIN\\username', password='Super Secret P@ssW0rds', database='master')

print('Creating cursor')
cursor = conn.cursor()

print('Executing query')
cursor.execute("""
SELECT MAX(req.total_elapsed_time) AS [total_time_ms]
FROM sys.dm_exec_requests AS req
WHERE req.sql_handle IS NOT NULL
""")

print('Fetching results')
row = cursor.fetchone()
while row:
    print(row[0])
    row = cursor.fetchone()

print('Closing connection')
conn.close
-------------END Code 

After filling in the details on your MSSQL Server you can simply run it and get the results


Part 2 will cover the Zenoss specific aspects of this...