Thursday, May 29, 2014

Setting vShield Edge Device Syslog via API

If you need to update your vSE devices to send traffic to a syslog server then you might be slightly disappointed to see that there are no instructions in the vCNS API guide to do this, especially if you have a bunch of edges. I experienced this same feeling today and am happy to say that now you don’t have to. Below are a quick couple scripts that will allow you to update single edges or a whole bunch at once using curl!

1. First off we need to get a list of our edge devices from the vCNS Manager. We will be using the edgeID acquired here to configure the syslog settings in a minute.

Get Edges

2. This list is a bit too much for our use so I’m going to parse it down to just the edgeID of all the devices.

vSE List

3. But I’m going to add them all to a text file (edges_test.txt) that I can parse later (code below):

curl -k -H "Authorization: Basic XXXXXXXXXXXXX" -X GET https://vsm.sub.domain.com/api/3.0/edges | xmllint --format - | grep "<id>edge-[0-9]*" | sed -n 's/<id>//p' | sed -n 's/<\/id>//p' > edges_test.txt

Now you have to make a decision, modify individual edges or all of them?

a. Let’s just edit one (MAKE SURE to set the edgeID in the below statement):

curl -k -H "Authorization: Basic XXXXXXXXXXXXX" -H "Content-Type: application/xml" -d '<?xml version="1.0" encoding="UTF-8"?><syslog><enabled>true</enabled><protocol>udp</protocol><serverAddresses><ipAddress>XX.XX.XX.XX</ipAddress></serverAddresses></syslog>' -X PUT https://vsm.sub.domain.com/api/3.0/edges/edge-282/syslog/config

b. Let’s edit them all! For this one I have a simple bash script that loops through the text file with all the edge devices and runs the curl statement against them.

Here’s the script:

while read edge; do
echo "Beginning Update on $edge"
curl -k -H "Authorization: Basic XXXXXXXXXXXXX" -H "Content-Type: application/xml" -d '<?xml version="1.0" encoding="UTF-8"?><syslog><enabled>true</enabled><protocol>udp</protocol><serverAddresses><ipAddress>XX.XX.XX.XX</ipAddress></serverAddresses></syslog>' -X PUT
https://vsm.sub.domain.com/api/3.0/edges/$edge/syslog/config
echo "Ending Update on $edge"
sleep 5s
done < edges_test.txt

Really simple but very effective!

start script

Now all that is left is to verify the results:

curl -k -H "Authorization: Basic XXXXXXXXXXXXX" -X GET https://vsm.sub.domain.com/api/3.0/edges/edge-282/syslog/config | xmllint --format -

Verify results

Have fun not having to use the UI :)

Thursday, March 20, 2014

Cloud Content Pack (vCD) for Log Insight

For those of you out there who use VMware vCloud Director and Log Insight you may be interested in a content pack that we have built for use by the OneCloud team to help make our cloud run smoother and to give us a ton of (wait for it) Insight into our environment. It's been a work in progress for about 9 months off and on but has served us very well. I hope that it serves you just as well.

Here are some screenshots:


I hope that this content pack is able to help you better manage your VMware vCloud Director environment. You can download the Content Pack here just be aware that this is not released by VMware and is not supported by them. Like everything else on my blog it just came from a random blogger on the internet :)


Friday, March 14, 2014

Monitoring VMware vCenter Servers using HTTP Health checks

If you are curious about monitoring your VMware vCenter Servers which I am sure that most of you are then you might find this interesting. Did you know that you can monitor the:

  1. VMware vSphere Profile-driven Storage Service
  2. vCenter Inventory Service
  3. ESX Agent Manager
  4. vService Manager
  5. vCenter Storage Monitoring Service
  6. vCenter Logging Services
  7. Autodeploy Service

All with a simple, unauthenticated HTTP GET request? Here’s how:

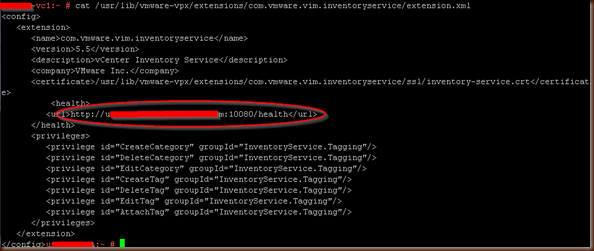
Inside of /usr/lib/vmware-vpx/extensions/ you will find several sub folders, one for each extension and inside of those an extension.xml file. That file contains the URL for the healthcheck for each service.

image

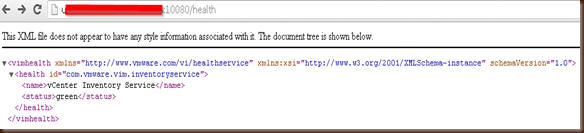
If you do a GET request against the URL listed it will return a bit of XML that includes the status of the service that you are inquiring about.

image

For quick reference here are the ones currently available in 5.x

https://<FQDN>/sps/health.xml - Storage Profile Service
https://<FQDN>/sms/health.xml - vCenter Storage Monitoring Service
http://<FQDN>/eam/eamService-web/health.xml - ESX Agent Manager
https://<FQDN>vsm/health.xml - vService Manager
https://<FQDN>:8443/ls/health - vCenter Logging Services
https://<FQDN>:6502/vmw/rbd/health-info - Autodeploy Service

The inventory Service works out of box on a Windows vCenter but on the vCSA you will need to open port 10080 on the iptables firewall first, preferably only to your monitoring host.

http://<FQDN>:10080/health - vCenter Inventory Service

and here is the needed firewall update:

iptables -I INPUT -p tcp –s <SOURCE IP> --dport 10080 -j ACCEPT
service iptables save

Thursday, March 6, 2014

Automatically Configure VMware Log Insight

One of the things that I recently needed to do was be able to script the configuration of Log Insight so that an admin no longer needed to go through the web UI to do the initial installation. The below script works but has a limitation: You need to know what your AD password hash and and the admin password hash and salt are. The way that I did this is by using the values from my original Log Insight server. You can be more clever if you are so inclined.

The script is designed to use the lower level Linux commands which can obviously be replaced with simple file copies but for what it’s worth here you go.

   1: #Change the default NTP Servers
   2: sed -i 's/server 0.us.pool.ntp.org/time.domain.com/' /etc/ntp.conf
   3: sed -i 's/server 1.us.pool.ntp.org/time1.domain.com/' /etc/ntp.conf
   4: sed -i 's/server 2.us.pool.ntp.org//' /etc/ntp.conf
   5: sed -i 's/server 3.us.pool.ntp.org//' /etc/ntp.conf
   7: cp /etc/ntp.conf /etc/ntp.target.conf
   8: chkconfig ntp --level 35 on
   9: service ntp restart
  10: #License LI
  11: echo "XXXXX-XXXXX-XXXXX-XXXXX" >> /usr/lib/loginsight/application/etc/license/loginsight_license.txt
  12: #Configure LI. I wanted this as low level as possible, nothing stops you from just copying the file instead of creating it line by line.
  13: mkdir /storage/core/loginsight/config
  14: echo "<config>" >> /storage/core/loginsight/config/loginsight-config.xml#9
  15: echo "     <version>" >> /storage/core/loginsight/config/loginsight-config.xml#9
  16: echo "         <strata-version value=\"1.5.0-1435442\" release-name=\"1.5 GA\" />" >> /storage/core/loginsight/config/loginsight-config.xml#9
  17: echo "     </version>" >> /storage/core/loginsight/config/loginsight-config.xml#9
  18: echo "     <alerts>" >> /storage/core/loginsight/config/loginsight-config.xml#9
  19: echo "         <admin-alert-receivers value=\"alert-notify-email@domain.com\" />" >> /storage/core/loginsight/config/loginsight-config.xml#9
  20: echo "     </alerts>" >> /storage/core/loginsight/config/loginsight-config.xml#9
  21: echo "     <ntp>" >> /storage/core/loginsight/config/loginsight-config.xml#9
  22: echo "         <ntp-servers value=\"time.domain.com, time1.domain.com\" />" >> /storage/core/loginsight/config/loginsight-config.xml#9
  23: echo "     </ntp>" >> /storage/core/loginsight/config/loginsight-config.xml#9
  24: echo "     <authentication>" >> /storage/core/loginsight/config/loginsight-config.xml#9
  25: echo "         <auth-method value=\"active-directory\" />" >> /storage/core/loginsight/config/loginsight-config.xml#9
  26: echo "         <ad-domain value=\"domain.com\" />" >> /storage/core/loginsight/config/loginsight-config.xml#9
  27: echo "         <ad-username value=\"username\" />" >> /storage/core/loginsight/config/loginsight-config.xml#9
  28: echo "         <ad-password value=\"XXXXXXXXXXXXXXXXX\" />" >> /storage/core/loginsight/config/loginsight-config.xml#9
  29: echo "     </authentication>" >> /storage/core/loginsight/config/loginsight-config.xml#9
  30: echo "     <smtp>" >> /storage/core/loginsight/config/loginsight-config.xml#9
  31: echo "         <server value=\"smtp.domain.com\" />" >> /storage/core/loginsight/config/loginsight-config.xml#9
  32: echo "         <default-sender value=\"log-insight-server1@domain.com\" />" >> /storage/core/loginsight/config/loginsight-config.xml#9
  33: echo "     </smtp>" >> /storage/core/loginsight/config/loginsight-config.xml#9
  34: echo "</config>" >> /storage/core/loginsight/config/loginsight-config.xml#9
  35: #Add Content Packs
  36: mkdir /usr/lib/loginsight/application/etc/content-packs/vCD
  37: #copy Content Pack contents to /usr/lib/loginsight/application/etc/content-packs/vCD/content.json
  38: #Update the admin email address and password
  39: /usr/lib/loginsight/application/lib/pgsql/bin/psql logdb -p 12543 -U liuser -c "UPDATE li_user SET email = 'admin-email@domain.com', password = 'XXXXXXXXXXXXXXXXXXX', salt = 'XXXXXXXX' WHERE name = 'admin';"
  40: #First start
  41: service loginsight restart
  42: #Add AD group to be a LI admin group.
  43: /usr/lib/loginsight/application/lib/pgsql/bin/psql logdb -p 12543 -U liuser -c "INSERT INTO li_group (group_id, domain, name, role_id) VALUES (5, 'domain.com','log_insight_admins',1);"

Now you are ready to login using either your new admin password or via your Active Directory account.


Thursday, February 13, 2014

SSRS Prompting for Authentication Using FQDN

I ran into a weird problem that I figured I would share the solution to since it seems to be floating around on the internet. Basically the scenario is that if I connect to my MSSQL Reporting Server using the IP or shortname it works fine but once I use the FQDN I get prompted for credentials and it never lets me authenticate. The root cause of this is Windows Loopback Check Functionality due to a DNS and Domain mismatch. Here's what I mean:

My Domain = domain.com
My FQDN = servere1.sub.domain.com

If you do not correctly set the "Primary DNS Suffix for this Computer" under System Properties > Change > More as seen below you will experience this issue.

If you are interested there is a MS KB http://support.microsoft.com/kb/926642 that has more details but does not necessarily address this specific cause.

Tuesday, November 19, 2013

Intelligent Password Changes with Puppet

I need to change the root password on all my hosts but I have a small problem: some hosts have older md5 hashed passwords and the newer ones use the more secure SHA-512 hash. If I did not care about the different hashes and wanted to have SHA-512 across the board I would do a very simple manifest entry to make this happen: Problem is I want to replace the old md5 hashes with new md5 hashes and the old SHA-512 with new SHA-512; not something that Puppet supports very easily. To do this we are going to build a new module with a Custom Fact written in Ruby. First off I need to explain some things if you are new to Puppet.

  • A module is stored under /etc/puppet/modules and is called via an include declaration in the site.pp Master Manifest
  • A module has it's own Manifest called init.pp under /etc/puppet/modules/<module_name>/manifests
  • Inside the init.pp is a class that MUST be named the same as your folder structure. Example: if the folder at /etc/puppet/modules/<module_name> is named "rootpass" then your class declaration must be "class rootpass {...."
  • A module is very powerful and the functionality is written in Ruby

Now that we have those out of the way lets start. If you are doing this your self here is the folder structure to make life easier:

password-structure

Let's visit each component a piece at a time

1. Custom Fact - sha512rootpass.rb. Puppet if Statements can be a bit tricky (see http://docs.puppetlabs.com/learning/variables.html) so in this case I needed a Custom Fact that checked to see if the root password was a SHA-512 hash which is indicated by it starting with "$6$" (md5 is $1$). If the root password is indeed a SHA-512 hash then the variable sha512rootpass will return with a "true" value. This functionality is delivered by Ruby Facter. For more information take a look at http://docs.puppetlabs.com/guides/custom_facts.html. My custom fact is silly simple, it just greps the shadow file for "root:$6$*" and if it's there then returns "true" which means that root has a SHA-512 hashed password.

password-sha512

2. New Class - init.pp. The logic for the operation that we actually want to run is located in the init.pp file. Here is where we define our class (reminder, it needs to be the same as you top level folder name). This one basically says "If root is using a SHA-512 password hash (defined by $sha512rootpass = true) replace it with this new one. If not then assume it's md5 and replace it with this new md5 hash.

password-init

Now we need to tell Puppet what servers to apply this to and this is done by modifying the site.pp Manifest on the Puppet Master. For now I'm going to apply it to all my nodes and so I just add it to my default. If you wanted you can add a new section that says "node <hostname> {include rootpass}" and it would be applied just to that host.

password-include

Now lets test it on an agent box that has an md5 hashed password and a box that has a SHA-512 password. Our older box with md5 is the first up to bat.....

password-md5

As you can see the password was a md5 ($1$) and was changed appropriately. Next let's look at a box with SHA-512.

password-shachange

As you can see the old password was a SHA-512 hash and has been replaced with the new SHA-512 hash. Success!

Getting Started with Puppet Open Source

I'm starting to work with Puppet and noticed that when I am using the open source version there is not really a good "Getting Started" guide and documentation is rather lacking. Not wanting anyone else to suffer through that here is my attempt at it. Hope it helps others.

Building the Puppet Master

First we are going to check what OS we are running, in my case it's CentOS 6.4 x64 so we're going to grab the repo from yum.puppetlabs.com. After that I look to see what's available and then finally install with a yum install puppet-server.noarch.

 puppet-repo

Once Puppet is installed we need to do some things. First we take a look at the stock puppet.conf file. Now, let's make it useful by adding the server name (remember: this is the Puppet Master so it's $HOSTNAME) and enabling pluginsync.

puppet-start-config

As you can see the file structure of Puppet is pretty empty with the open source version... Let's add site.pp which is the master Manifest for all your Puppet tasks.

puppet-site.pp

I'm going to add a very simple puppet command that applies to all hosts (nodes) and creates a new user with a SHA-512 password hash. This Manifest file is the source of truth for all your Puppet tasks, more about that later for now remember site.pp is critical.

puppet-site-pp-creation

Lastly before starting the services we need to open 2 ports on the firewall.

iptables-puppet

Now that the Manifest is complete and we have open ports let's start the Puppet and Puppet Master services.

puppet-running

We did all that work, let's see if Puppet works. (Note, if you get an error here there is a good chance that iptables is blocking your Puppet traffic). To do that we are going to call the Puppet agent and tell it to run, but not apply any changes (-noop). As we can see it detected that our new user account is missing but did not change anything.

puppet-noop-test

That's all great, now let's apply it. There are a couple ways to do this:

1. Wait 30 minutes, the agent will automatically run and apply the change.

2. Run puppet agent --test

puppet-add-user

As we can see, the change was successfully made on the Puppet Master, now lets go start installing an agent on another host.

Installing Puppet Agents

As you can see we are doing basically the same thing as on the Puppet Master but only installing the Puppet Agent.

puppet-agent-install

After the install completes we need to configure the agent to talk to the Puppet Master. This configuration is done in the same /etc/puppet/puppet.conf as the Puppet Master but we change what we add...

puppet-agent-config

Next you need to start the Puppet Agent Service: puppet resource service puppet ensure=running enable=true

At this point assuming no firewall issues your agent is now talking to the Puppet Master (test using the "puppet agent --test --noop" command we used earlier); however there is still one thing that needs to be done. We need to approve the agent's certificate on the Puppet Master; once that is complete then the agent will start applying changes that are specified in the Puppet Master's site.pp. You do that from the Puppet Master using the puppet cert commands:

puppet-sign-cert

Congratulations! You just setup a Puppet Open Source instance and are now well on your way to using Puppet to help you manage your infrastructure.